

Dockerizing a project with Docker Compose
The quick and easy way to setup Docker


Overview
You’ve all heard about Docker, its benefits, and how it helps containerize your projects in a workable environment, or you wouldn’t be here.
As cool as it all is, beginners can still find it daunting. In this post, you’ll learn an easy way to dockerize your projects. Let’s dive into it.
How-to
To make things easier, we’re going to use Docker Compose. For this demo, we’ve set up a simple Next.js project which contains only the defaults. Dockerizing takes very little effort, all you need is:
- docker-compose.yml
- Dockerfile (optional, only for custom images)
If you don’t have Docker already installed, you can do so from here.
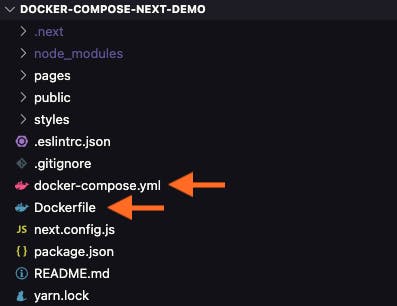
Here’s a screenshot of what the directory will look like when done.
docker-compose.yml
To get started, you’ll need a docker-compose.yml file. This is the file where we will do most of our work.
Note that docker-compose.yml needs to be at the root of your project.
Let’s say you have a project with a folder called subfolder1. And subfolder1 contains all of your project files. Then docker-compose.yml needs to be in subfolder1.
The root folder of our project in the Docker environment can be easily set if we create this file in the folder which we want as our root folder.
Now that you know which folder you want as your root, let’s get started with our file.
version: "3.5"

services:
  app:
    # build: ./
        image: node:16-buster
    command: sh -c "yarn && yarn dev"
    ports:
      - 3000:3000
    working_dir: /folder_name
    volumes:
      - ./:/folder_name
Let’s break down the docker-compose example above and see what makes it tick.
Breakdown
versiontells Docker which version of Docker to use.Under
services, we setup our various environments to use.
Let’s say we want to create an environment called app. Here’s what it'll need:
Either an image or a build.
An image is an external Docker image we can use. This is great to get started, since there are a ton of images for us to use that are prepped and setup.
A build is when we want to use our own image. This can come in useful when we want to setup specific things in our environment, which is hard to find online.
commandis used when we want to run a command when the environment is run. We can usesh -cto run commands in a shell, followed byyarn && yarn devto install all of our dependencies and run the dev command using yarn. This is a common set of commands to run in React and Next projects, but the actual command can be any command you want to run.portstells Docker which ports to expose. In our case, we’re taking the 3000 port on our local machine and exposing it on the 3000 port on our Docker environment.working_dirprepares a folder for us to use on our Docker environment. However, it would currently be empty. That’s wherevolumescomes in. We can map our current working directory./to the folder_name folder on our Docker environment.
And that’s it for the setup. There are more options to choose from, but these are ideal to start with. If you’d like to know more, you can visit the Compose Reference page.
Now let’s run this and see how it works.
Running docker-compose
If you have docker installed, you’ll have access to docker-compose. Once you run Docker with the instructions from our docker-compose.yml file,
docker-compose downloads the image or looks for the build we specified
sets up the environment
runs the commands and
exposes the ports
Now you should be ready to go.
Running the command as-is will show you the live output in the terminal.
Want it to run quietly in the background? Just run docker-compose up -d and docker-compose will run in its detached form, allowing you to go about your day in the same terminal.
Creating our own image with Dockerfile
In Docker, you can create your own image to have more control over what comes pre-installed on it. Let’s get started.
FROM node:16-buster
WORKDIR /folder_name
COPY ./
RUN yarn
COPY . .
Start with creating a file named Dockerfile. Note that it doesn’t have an extension.
We’ve provided an example of a Dockerfile above, so let’s see how it works.
Breakdown
FROM specifies the base image we want to use. Since we’re using a Next.js project, we know we need Node to be installed. So, let’s get an image that comes with Node preinstalled.
WORKDIR specifies the directory we want to create for our project.
COPY allows us to copy files and directories. In this case, we want to copy everything in our current directory.
RUN is how we run commands when building the image. Say you have your files here, you’d like to run a yarn so that your environment is ready.
There are more configurations you can use, but this is enough to get started. You can refer to the Dockerfile Reference page to know more.
Usage
Once you have your custom image, head over to your docker-compose.yml file.
Go to a service you would like to use your image on.
Replace the image entry you see with build and enter the directory that holds your Dockerfile.
Now your docker-compose.yml will build your custom image instead of downloading an image from an external source.
When running docker-compose.yml, it will build the custom image when running for the first time. If you’d prefer to manually build the image again at some point, you can run docker-compose up --build, which rebuilds the image, even if it has already been built.
Custom Image vs Existing Image
Wondering why you should invest efforts in a custom image when there are existing ones you can pull from? Simple reason - To decide what your image contains when built.
Suppose you have a list of packages that you’re going to use. You can specify the installation of those packages in your Dockerfile. When building your image, the installation steps are run and your image now contains the packages.
In most cases, images need to be built once, unless there are some changes to the image itself.
So you’re installing the package once and making it available for all future runs of Docker. This can save a lot of time and processing power.
If you’re using an existing image, then you have to install your packages with every run of Docker.
Conclusion
Docker is a really useful tool that’s been widely adopted for a reason. Not only does it provide a lot of features, but it’s easy to set up and get going.
You can choose to use existing images created by the community, or you can use them as a base to create one that suits your needs. Flexibility is key and Docker provides this without unnecessary complexity.